
My Facebook Live video on car hacking brought in over 3,600 viewers!
This tutorial will guide you step-by-step into one of the hottest cyber skills in the world: car hacking!
Using VirtualBox and Kali Linux, you can start car hacking using completely free open-source software and tools, including can-utils, ICSim, ScanTool, Wireshark, and tcpdump. You’ll create a functioning CAN (controller area network) simulator with a dashboard just like the one in your car. I’ll even show you how to perform a “replay attack”, recording packets from the CAN bus and replaying them to change the car’s settings, sensors, and controls! When you’re ready to try you skill on an actual automobile, you can buy (or build) the hardware for $20 to $75 (USD) and connect to your vehicle
I’m a Certified Ethical Hacker, and I’ve always worked on my own cars. But when I started car hacking a little over 10 years ago, there weren’t any clear, step-by-step, easy-to-follow instructions for beginners. Ten years later, there still aren’t any complete car hacking beginner-to-pro tutorials out there that show you how to get started and how to actually connect to a real car or truck, so I wrote this post based on my popular presentations at hacking conferences and workshops (GenCyber, CCERP, NCWA, STEM, and more).
In this tutorial, you’ll be able to:
- install free, open-source car-hacking tools on your computer (desktop, laptop, even a Raspberry Pi, or on a Linux virtual machine),
- perform a replay attack on a simulated controller area network (CAN),
- buy or build the low-cost tools necessary to test for similar vulnerabilities in modern automobiles.
If you’ve got any ethical hacking experience, you can use a Kali Linux VM (the most popular ethical hacking toolkit) for your car-hacking workstation. And the only physical equipment needed to connect the software to a modern car, a USB to OBD-II cable or wireless connector, can be built or bought easily online for around $20-75 (USD).
Introduction to the CAN Bus
Car hacking itself is surprisingly similar to hacking other networked devices. We can use a network sniffer to view packets as they move across the controller area network, or CAN bus, in an automobile. The CAN (controller area network) bus enables communication between the vehicle’s sensors and its various electronic control units (ECUs). Modern production cars can have as many as 70 or more ECUs controlling the engine, airbags, anti-lock braking system, tail lights, entertainment system, and more. One advantage of the CAN bus architecture is that it allows all of these devices to communicate over as little as one pair of shared wires running to each sensor, controller,and ECU.
CAN bus protocol messages are small (8 bytes or less of data inside another 8-byte package), with no addresses in the messages, just a priority value (messages from the engine or brakes get higher priority than the air conditioning or audio player). The CAN bus protocol was not built with modern security in mind.
Brief History of Car Hacking
In 2011, the first widely accepted remote hack of a production vehicle was accomplished by a team of researchers at the University of California, San Diego, against a 2011 Chevy Malibu. The researchers were able to cause the car’s brakes to lock up while driving using two different remote attack vectors.
In 2015, researchers Charlie Miller and Chris Valasek remotely controlled the steering, braking, acceleration, and other controls of a 2015 Jeep Cherokee. High-profile hacks were demonstrated against electric vehicles, including a 2016 Tesla Model S and a 2018 BMW i3 by Tencent’s Keen Security Lab.
An Open Source Toolkit for Car Hacking
ICSim from the OpenGarages team, is a free car simulator to practice car hacking on.
The software I use for car hacking is both free and open-source. The first app is from OpenGarages.org, the Instrument Cluster Simulator, or ICSim package (get it from GitHub). ICSim was created by car hacking researcher Craig Smith, author of The Car Hacker’s Handbook (No Starch Press, 2016). ICSim includes both a dashboard simulator with a speedometer, door lock indicators, and turn signal indicators, and a control panel that allows the user to interact with the simulated automobile network, applying acceleration and controlling the door locks and turn signals. ICSim relies on other free Linux tools, including the CAN Utilities, or can-utils, that are available under the package installer repositories for most Linux distributions.
In the following section, we will detail the step-by-step installation and configuration of the ICSim software and related tools for use in a classroom, computer lab, or automotive research workstation, as well as running in a virtual machine on a commodity Windows, Mac or Linux laptop.
Installation
If you’re familiar with Linux, especially Kali Linux for ethical hacking, you’ll find both the setup and the use of the tools themselves easy to follow. Those with less experience, especially with less command-line Linux expertise, can still install and run the tools in a virtual machine similar to the ones used in most hands-on courses in ethical hacking.This installation will assume the user has either a workstation running Kali Linux or a virtual machine running Kali Linux in a platform like VMware or VirtualBox. For the car hacking modules, we will use open-source tools from OpenGarages.org developed by Craig Smith.
Installing Dependencies
The first step in setting up the OpenGarages.org car hacking software is installing prerequisite software known as dependencies. First, update Kali Linux by typing the update command into a new Terminal (command-line) window:
sudo apt-get update
Then, install the LibSDL (SDL stands for Simple DirectMedia Layer, a cross-platform development library for computer graphics and audio) development libraries. LibSDL is used by the Instrument Cluster Simulator software from OpenGarages to draw and animate the virtual dashboard (or instrument cluster), as well as to access various game controllers, like the PlayStation PS3 controller.
Install both the libsdl2-dev and libsdl2-image-dev libraries with the command:
sudo apt-get install libsdl2-dev libsdl2-image-dev
After the LibSDL libraries are installed, add the CAN utilities. CAN is short for controller area network, the primary network in modern automobiles. The CAN utilities are included in some Linux distributions, but not in Kali as of this writing. The CAN utilities can be installed using the command:
sudo apt-get install can-utils
Once the LibSDL and CAN utilities software dependencies are in place, we can download and install the ICSim car hacking tools.
Downloading and Installing ICSim
We will utilize git to download the OpenGarages.org software ICSim, short for Instrument Cluster Simulator. Git is the most widely used version control system, and is free and open-source (created by Linus Torvalds, the creator of Linux himself). It’s also included in Kali, as well as in most Linux distributions.
Git will clone, or copy the ICSim project files, directly to your local computer. Set the directory to your home directory with the command:
cd ~
That’s cd (short for change directory) followed by a tilde (~) symbol, to signify the user’s home directory. On Kali Linux, this is usually the directory /root/, corresponding to the root user.
Download and expand the ICSim project files using git with the command:
git clone https://github.com/zombieCraig/ICSim.git
Git will download the project files for ICSim into a folder labeled ICSim in your home directory. Change into the ICSim folder and list the contents:
cd ICSim/
ls
You should see several files, including two executable files labeled controls and icsim, inside the ICSim folder.
Preparing the Virtual CAN Network
Run the setup script by typing:
sh ~/ICSim/setup_vcan.sh
You can verify that the vcan0 network link is active by typing ifconfig. In addition to your regular network interfaces, you should now see vcan0 listed. With the vcan0 network link active, we can run the Instrument Cluster Simulator and the Control Panel to simulate a live controller area network and instrument cluster in a modern automobile.
Running the ICSim Software
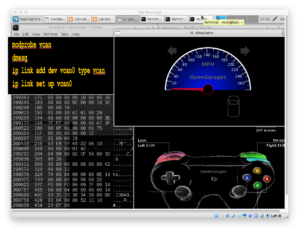
The standard setup for running ICSim includes at least two components, the icsim Instrument Cluster Simulator program file, which simulates an automobile’s dashboard instrument panel, and the controls executable, which gives the user control of the virtual automobile, including acceleration, steering, door locks, and turn signals. For a first experience for beginning car hackers, it’s also instructive to open a third terminal window running a network sniffer to view packets on this new virtual CAN network.
ICSim includes a dashboard simulator and a controller app to let you “drive” your virtual car!
Open three terminal windows. In the first window, open the Instrument Cluster Simulator application, icsim, on the vcan0 virtual CAN network interface we created:
~/ICSim/icsim vcan0
That’s vcan0, with a zero, denoting the virtual CAN network we created by running setup_vcan.sh above. The dashboard instrument panel simulator will appear as shown to the right.
Nothing on the dashboard will light up, and the speedometer will stay at zero, because there’s no traffic on the vcan0 network yet. We’ll fix that by starting the ICSim’s controls. In a second terminal window, open the controls app:
~/ICSim/controls vcan0
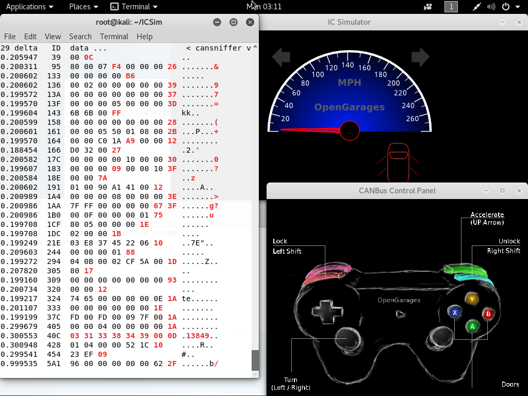
The CANBus Control Panel application will appear on the screen, with a GUI mimicking the PlayStation 3’s PS3 controller (which, by the way, is supported by the controls app). The keyboard controls are labeled on the controller GUI: acceleration is controlled with the Up arrow key, turn signals with the Left and Right arrow keys, and so on.
Right-click (or control-click) on the title bar at the top of the window, and select Always on Top to keep the control panel app visible.
Resize the controller window so that it fits on the screen with the dashboard simulator. You’ll notice that the speedometer is now “idling”, or jittering slightly while sitting at 0 MPH. This is because the controller app is sending mild noise signals over the virtual CAN bus network vcan0 to simulate a real car’s CAN bus.
The keyboard controls shown in Table 1 will only function when the CANBus Control Panel app is currently selected. If the dashboard doesn’t seem to be responding, first click your mouse in the CANBus Control Panel window, then use the keys given below to see changes in the IC Simulator dashboard:
| Function | Key(s) |
| Accelerate | Up Arrow (↑) |
| Left/Right Turn Signal | Left/Right Arrow (←/→) |
| Unlock Front L/R Doors | Right-Shift+A, Right-Shift+B |
| Unlock Back L/R Doors | Right-Shift+X, Right-Shift+Y |
| Lock All Doors | Hold Right Shift Key, Tap Left Shift |
| Unlock All Doors | Hold Left Shift Key, Tap Right Shift |
Table 1: Keyboard controls for the CANBus Control Panel app, and their associated function viewable in the IC Simulator dashboard app.
Click the CANBus Control Panel window and press a few of the keys and key combinations given in Table 1 to see the virtual car take off, signal for left and right turns, lock and unlock doors, and so on.
Finally, let’s view the network packets that our control panel app is sending across the vcan0 network to the dashboard simulator by running cansniffer, the CAN network sniffer included in the CAN Utilities software we installed earlier. From a third terminal window, run:
cansniffer -c vcan0
The cansniffer executable is not provided in the ICSim package; it’s in the can-utils software we installed prior to downloading the ICSim software. As you can see, the network traffic looks similar to a raw tcpdump or captured packet data in Wireshark.
The cansniffer -c flag tells the sniffer to colorize bytes that are changing, which can help us identify bytes that vary as we interact with the CAN bus via the control panel app.
With these three windows open, the icsim dashboard, the controls control panel, and the cansniffer network sniffer, we can see one perspective of how sensors, actuators, and ECUs interact over a simple CAN bus. Try accelerating all the way to 90 MPH, the maximum speed configured for the controller, then lock and unlock all the doors, and press the left and right turn signals while accelerating. The dashboard will reflect your keystrokes regardless of whether such combinations would be safe to attempt in a real vehicle.
In the next section, we’ll see how to use this combination of tools to perform a common cybersecurity test by demonstrating the ability to capture packets and replay them on the CAN network to trigger sensors and controls without interaction on the part of the driver.
Replay Attacks
In a replay attack, a hacker captures packets from interesting network traffic and attempts to re-inject them into the network later. A replay attack can be one of the first steps a security tester or an attacker might use in attempting to reverse-engineer a networked device.
Fortunately, just like the cansniffer software allowed us to view packets on the virtual CAN network interface, there are additional tools in the can-utils library that enable us to capture and replay those packets. In this example lab module, we’ll demonstrate the replay attack in two steps: capturing packets with known commands from the virtual CAN network traffic, and replaying those packets on the virtual CAN bus.
Capturing the CAN Bus Packets
If you still have the icsim, controls, and cansniffer windows active from the previous section, press Ctrl-C (control-C) in the cansniffer window to stop the network sniffer.
If you’ve closed the car-hacking windows, or if you’ve restarted your Kali VM, you can run the following commands to recreate the vcan0 network and open the icsim dashboard and controls control panel on vcan0:
cd ~/ICSim
sh setup_vcan.sh
./icsim vcan0 &
./controls vcan0 &
Note that by adding the ampersand (&) to the end of the last two commands, you can run both the IC Simulator and CANBus Control Panel from the same terminal window. The ampersand places each command in the “background”, allowing the user to continue working in the command line shell while a process executes.
In a separate terminal window, run the candump tool to log all the traffic on vcan0 to a file:
candump -l vcan0
Note the -l is dash-lowercase-L (not dash-one). The candump -l flag stands for log, or capture the CAN traffic and save it to a file. We still use the vcan0 network interface, because that’s the interface where our dashboard and controller are simulating CAN traffic.
Immediately after starting candump, click back on the CANBus Control Panel window and begin pressing keys to accelerate, activate the turn signals, and lock and unlock doors. After a few seconds of “driving”, click back on the candump terminal window and press Ctrl-C (control-C) to stop the packet capture.
List the contents of the current directory with the ls command, and you’ll see a new file in the format candump-YYYY-MM-DD_time.log, such as:
candump-2018-07-23_083845.log
This log file contains all the packets we just captured. Now it’s time to close the controller window and try the replay attack against our virtual CAN bus.
Replaying the CAN Bus Packets
Close the CANBus Control Panel window. You’ll notice the needle on the virtual speedometer stops “idling”, because the controller was adding the noise and jitter. Right now, the CAN bus is completely quiet. But, we can re-inject the packets we captured above and observe whether the packets will have the same effect on the dashboard as the real controller did. This is a simple, safe replay hack, but we’ll learn how to extend it to try this out on a real automobile.
In the terminal window you were using to run the candump tool, type the following command:
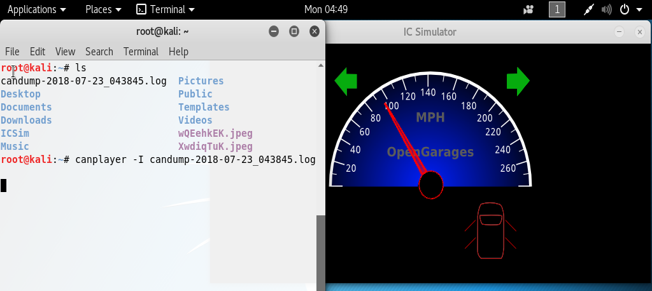
In this replay attack, we’ve unlocked all four doors while driving 90 MPH with both turn signals on!
canplayer -I candump-2018-07-23_083845.log
The -I flag tells canplayer to use the supplied log file as input. Note that you can start typing the log filename and just press the tab key (type c-a-n and press the Tab key to auto-complete the log file name) instead of typing the long sequence of digits. Also notice that you don’t have to specify which interface to use, vcan0, like you did with all the previous CAN utilities. This is because canplayer will replay the packets on the same interface they were captured on.
After pressing the enter key, you should see the speedometer and other dashboard components do the same thing they did when you captured the packets, as shown to the right. Notice we were able to get both the left and right turn signals on at the same time, and unlock all the doors, while the car was going at over 90 miles per hour!
You’re able to see the same indicators, even though the car is turned “off”—there are no controls active, but you’re changing the dashboard as if the car is actively running.
In fact, if you run canplayer with the CANBus Control Panel still active, the speedometer will jump between its “real” value, determined by the controller app, and the value the canplayer app is replaying onto the virtual CAN bus.
Connecting to a Real Automobile
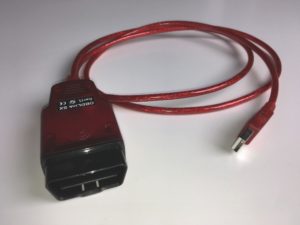
The OBDLink is an easy-to-use first step into car hacking, for around $29 USD [click here to see it on Amazon].
The OBDLink SX is an inexpensive way to start working with your car’s CAN messages through a graphical (GUI) app. To connect to the OBDLink cable shown for the first time, it’s helpful to install the ScanTool software from ScanTool.net (Hobbs, 2015), available as an apt-get package:
sudo apt-get install scantool
Then, run the scantool application by typing the command:
scantool

The ScanTool software gives you a GUI interface to read sensors and diagnostic codes for your car or truck.
You can plug the OBD-II cable into your laptop or computer using the USB adapter end, plug the OBD-II connector into your car’s OBD port under the steering wheel on the driver’s side near the floorboard, and turn on the automobile’s ignition. If you’re using a virtual machine, you’ll need to connect the USB device to your VM in VirtualBox by selecting Devices > USB > ScanTool OBDLink (or similar).
The ScanTool software will connect to automobile’s CAN network to perform tasks like reading diagnostic codes (and resetting them, like your mechanic does when he changes your oil, etc.), reading sensor data (with room for over eight pages of sensors to accommodate most modern vehicles), and more. The Linux version of the ScanTool GUI is shown right.
Real Car Hacking
Tools like OBDLink are an easy way to get started, and you may be able to capture some packets from ttyUSB or usbmon0, but they’re not reliable for performing a replay attack. To perform a real replay attack against your car, you’ll need a true CAN to USB connection.
The cheapest option is CANable, from canable.io, for just about $29 US. It requires you to connect wires directly to the small circuit board, which plugs into a micro-USB connector that you can connect to your Kali Linux box as can0 (instead of virtual CAN vcan0, this is an actual CAN connection, can0).
A better, more durable option is the CANtact CAN-to-USB adapter ($65 on Amazon) plus an OBD-II to 9-pin adapter ($10). For just under $75 (plus a regular USB printer cable you probably already have around the house), you can connect directly from your laptop to your car and record real CAN packets and replay them.
Further Extension: Hacking the Car Hacking Software
One time when I taught this car hacking module in an ethical hacking course, my students asked if they could modify the open-source ICSim software to allow the speedometer to go faster than 90 MPH. ICSim is open-source, so the answer was YES!
Using a simple text editor, running gedit controls.c (any text editor will do, we just chose gedit) to view the controls.c file revealed the following lines of code, in lines 80-83 of the controls.c source code:
#define MAX_SPEED 90.0 // 270.0 is full gauge speed
#define ACCEL_RATE 8.0 // 0-MAX_SPEED in seconds
#define USB_CONTROLLER 0
#define PS3_CONTROLLER 1
Changing the maximum speed of the IC Simulator is as easy as editing the MAX_SPEED constant value to a higher number:
#define MAX_SPEED 300.0
Most students chose values between 260.0 and 300.0, but some went as high as 1000.0 MPH, causing the speedometer to “wrap” around three times! Save the file, and run make in the ICSim folder:
cd ~/ICSim
make
If the make command is successful, all you have to do is run icsim and controls like we did in the Implementation section, and the accelerator now runs the car to 260 MPH, or beyond!
On some systems (mostly 64-bit), the make command will generate an error due to a bad lib.o file. Fixing this requires a few additional steps that we’ll list here without much explanation, as it’s beyond the scope of this document, but it’s worth adding the fix for those students and researchers interested enough to modify the source code. If your make command failed after editing the controls.c source code, run the following eight commands from a terminal window:
cd ~
git clone https://github.com/linux-can/can-utils
cd can-utils
make
cp lib.o ~/ICSim
cd ~/ICSim
make clean
make
In short, the above steps replace your incompatible lib.o file with a newly compiled version from an updated can-utils built on your computer’s architecture. Now run icsim and controls and you should see the new, updated and improved version of your IC Simulator and CANBus Control Panel apps.
Where to learn more…

If you’d like step-by-step videos showing you how to set up the car hacking software, sign up for my Ethical Hacking course for just $10 on Udemy!
I hope you’ve enjoyed learning how to set up free, open-source car-hacking software for instructional or research use. You can also add an inexpensive (under $30USD) physical cable or wireless connector capable of connecting to modern production vehicles through the OBD-II on-board-diagnostic port. To go full car-hacking, you might spend as much as $75, but you’ll be able to do everything to a real-life automobile that you did on the simulator.
If you’d like step-by-step videos of me performing all of the steps above, enroll in my Ethical Hacking course for just $10 on Udemy, 80% off the retail price using the coupon code FRIENDS10.
I’d love to hear from you in the comments below if you use any of the car hacking tools I’ve described above – leave me a note!
Also, let me know if there’s something else you’d like to see here – I’m glad to add more! Sign up for my mailing list, and I’ll even send you my car-hacking manual ebook for free!
Happy car hacking!


October 20, 2018
Computer Science, Social Media, Technology